3D print troubleshooting guide
Looking to improve the quality of your 3D printed models, but not sure where to start? Most of the time these issues are easy to fix and don’t require messing around with print settings. We have compiled a list of some common issues that can happen when 3D printing with a short explanation of how you might fix them.
It’s important to note that an issue may have a couple of possible causes so it is important to check all possibilities.
Bad first layer/not extruding at the start

Filament has not been loaded properly
There will be little to no extrusion at the start of the print if the filament hasn’t been pulled in far enough by the extruder motor. This is because the filament may have come out or hasn’t reached the area in the extruder where it gets melted yet. When loading filament, make sure you can feel the extruder motor ‘grab’ the filament and pull it through.
Z offset is too low
If your printer is producing incomplete first layers or isn’t printing at all at the start of a print, your Z offset may be too low and need calibrating. You may also hear the extruder nozzle scrape against the print or a clunking noise coming from the extruder motor.
The extruder is blocked
Little to no extrusion can be a result of a blockage somewhere in the extruder. It may be as simple as a piece of filament getting snapped off inside the extruder, or a buildup of melted plastic as a result of a low Z offset.
Not sticking to the bed
The model you’re printing isn’t positioned on the bed correctly
You may have designed or downloaded something that doesn’t have a great surface to print from at the base. You can try and fix this by:
- Redesigning your part to have a nice flat surface to print off. This may involve rotating the part to find the best possible side to print from (especially for 3D models you’ve downloaded).
- If you’ve already tried the above, simply try using support material on your next attempt. This will help fill in the spots where you can’t get a completely flat surface to print from.
Print bed isn’t level
Depending on the model of 3D printer you’re using, there may be a few things that you need to fix to get a level bed:
- Your printer may have bed levelling screws that need adjusting.
- Your printers auto levelling is being thrown out because of a loose axis.
Z offset is too high
If your prints are not sticking to the bed and getting caught in the extruder nozzle, your Z offset may be too high and need calibrating. Whether your print fails halfway through or turns into clumps of plastic at the start, simply re-calibrate your Z offset.
Print surface factors
Print bed adhesion can depend on the model of 3D printer you have and the type of material you are using. Some things to be mindful of include:
- Special print surfaces such as BuildTak can help plastics stick a lot better.
- If your printer has a heated bed, using it will help prevent the lower layers from warping and causing the rest of the print to come loose.
- It’s always a good idea to make sure that your print bed is clean and free of dust and oils that can build up over time. You can easily clean this off with some isopropyl rubbing alcohol.
Printing ‘helpers’
Your print may just need a little more surface area to help it stick to the print bed effectively. This can be achieved by either adding ‘feet’ to your model (small discs that can be removed once the print has finished) or by enabling a ‘brim’ which expands the first layer of your model and is easily removed after printing.
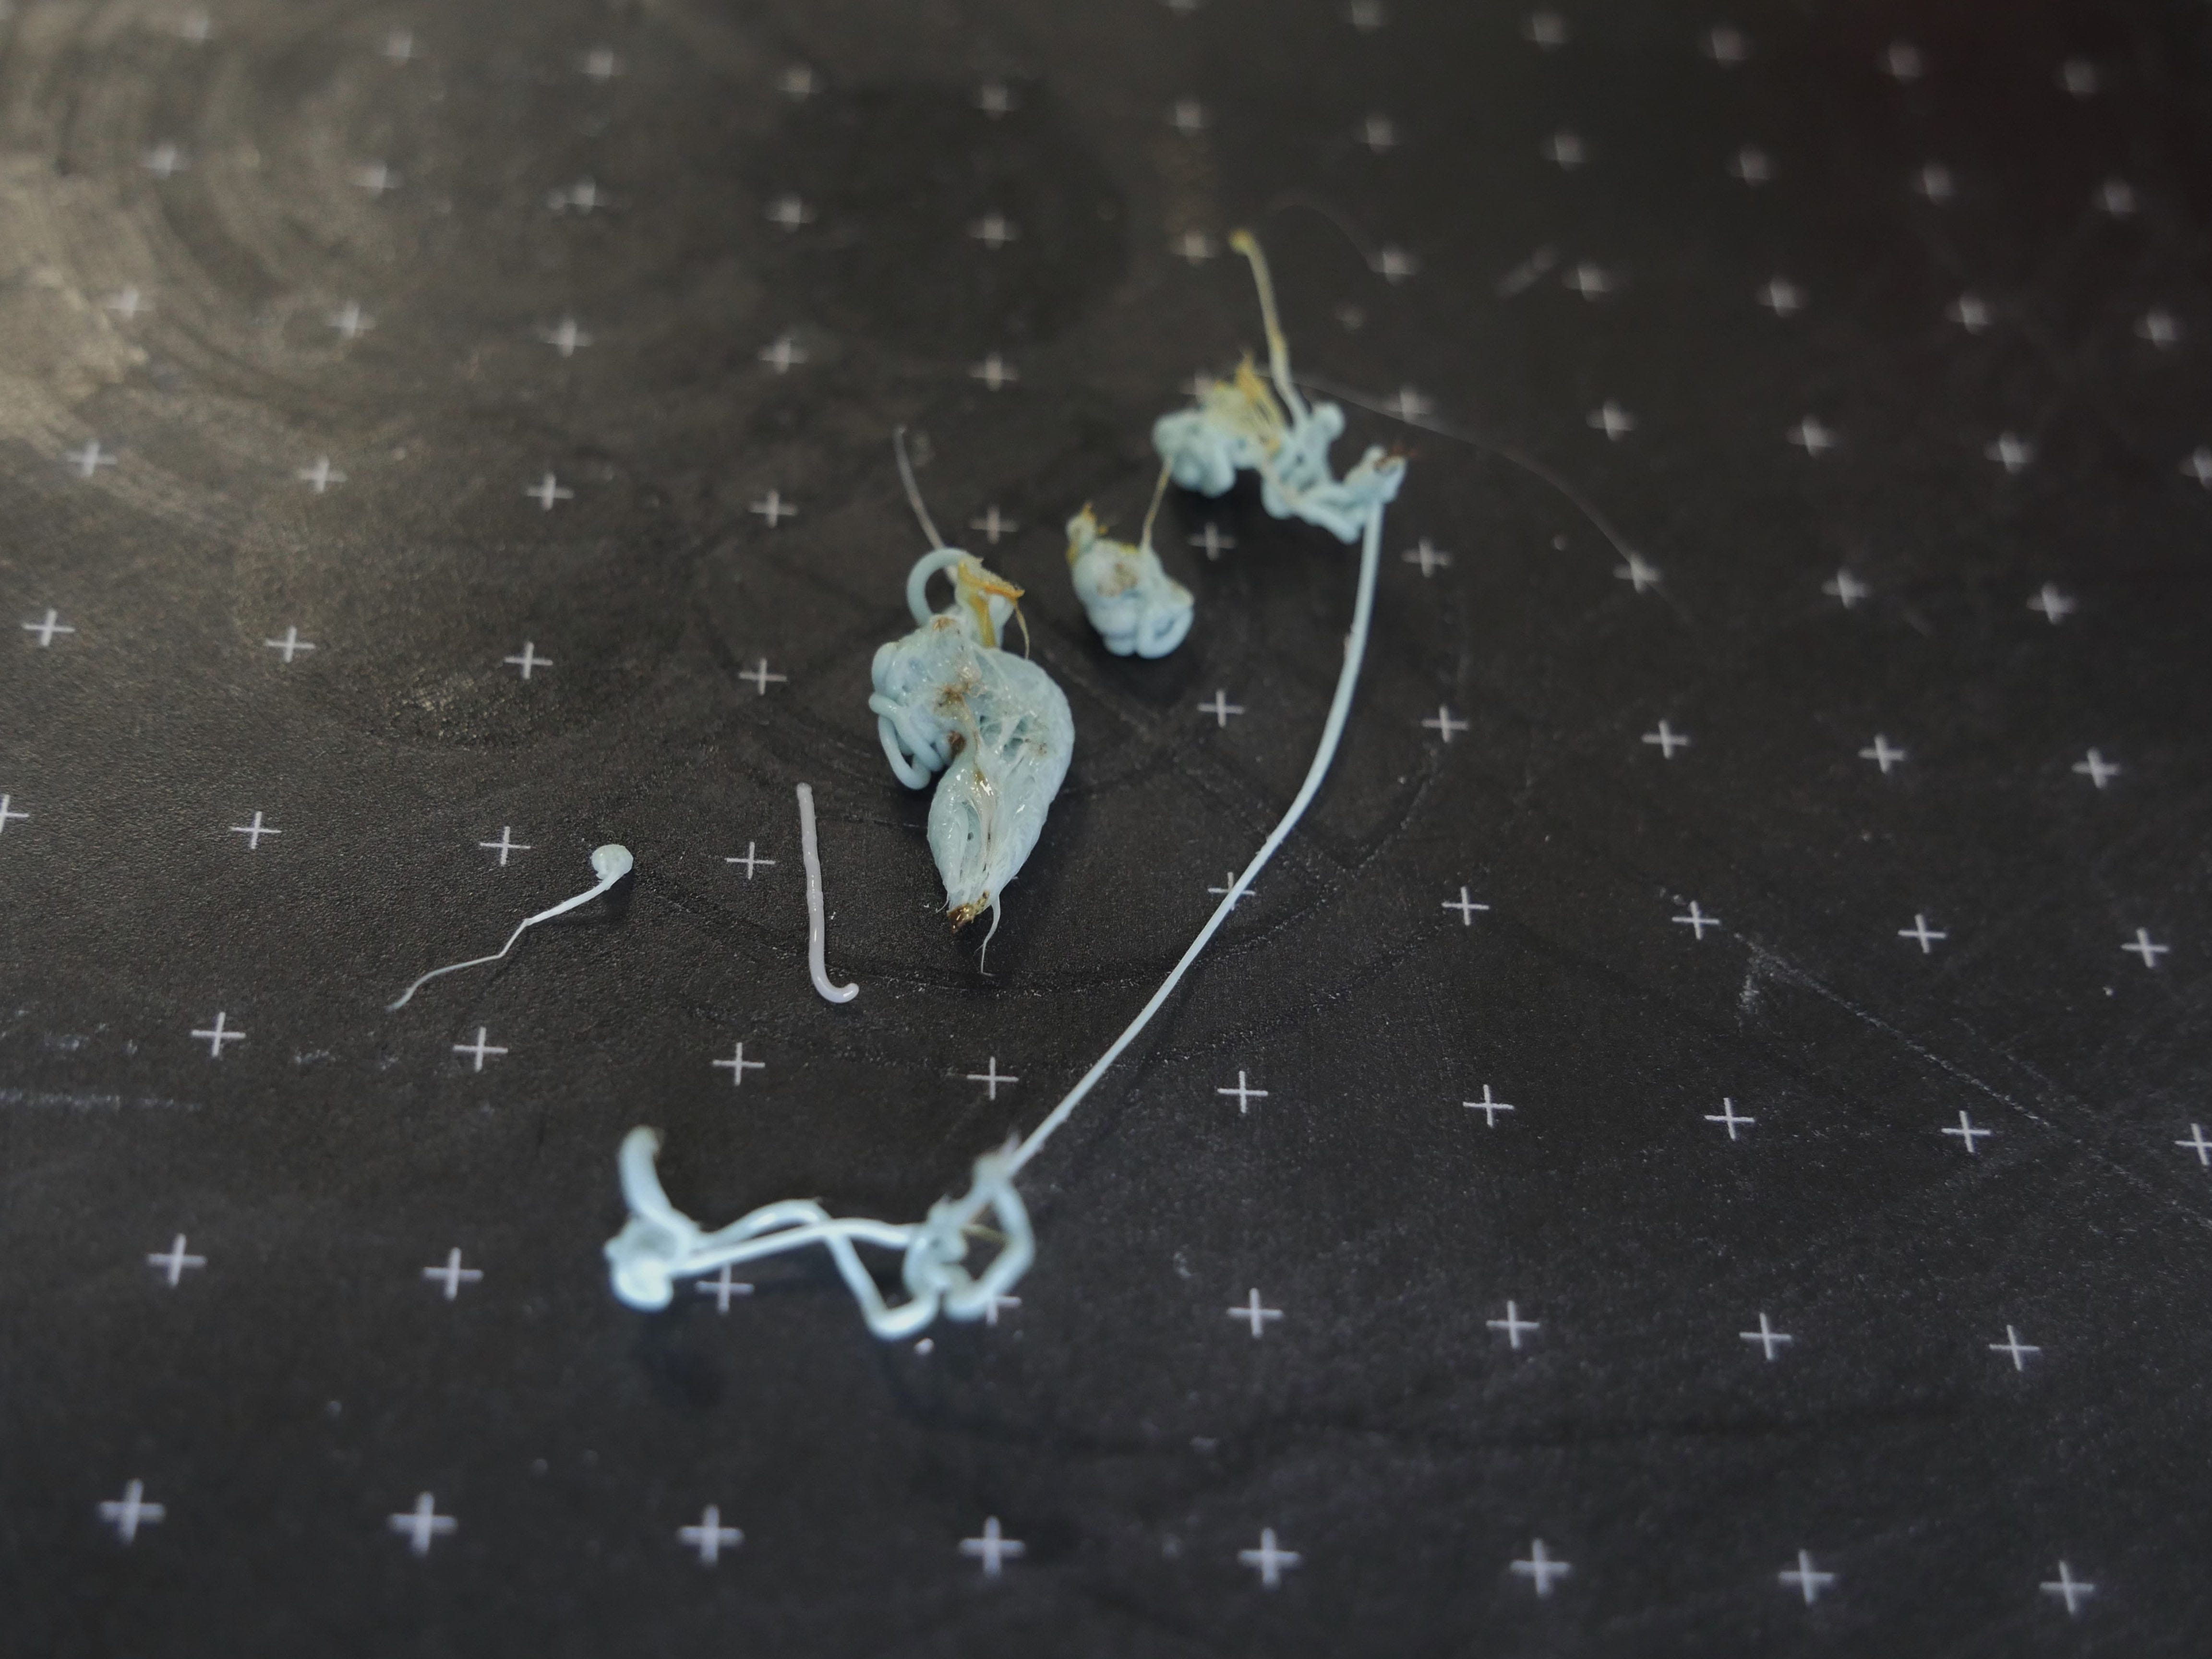
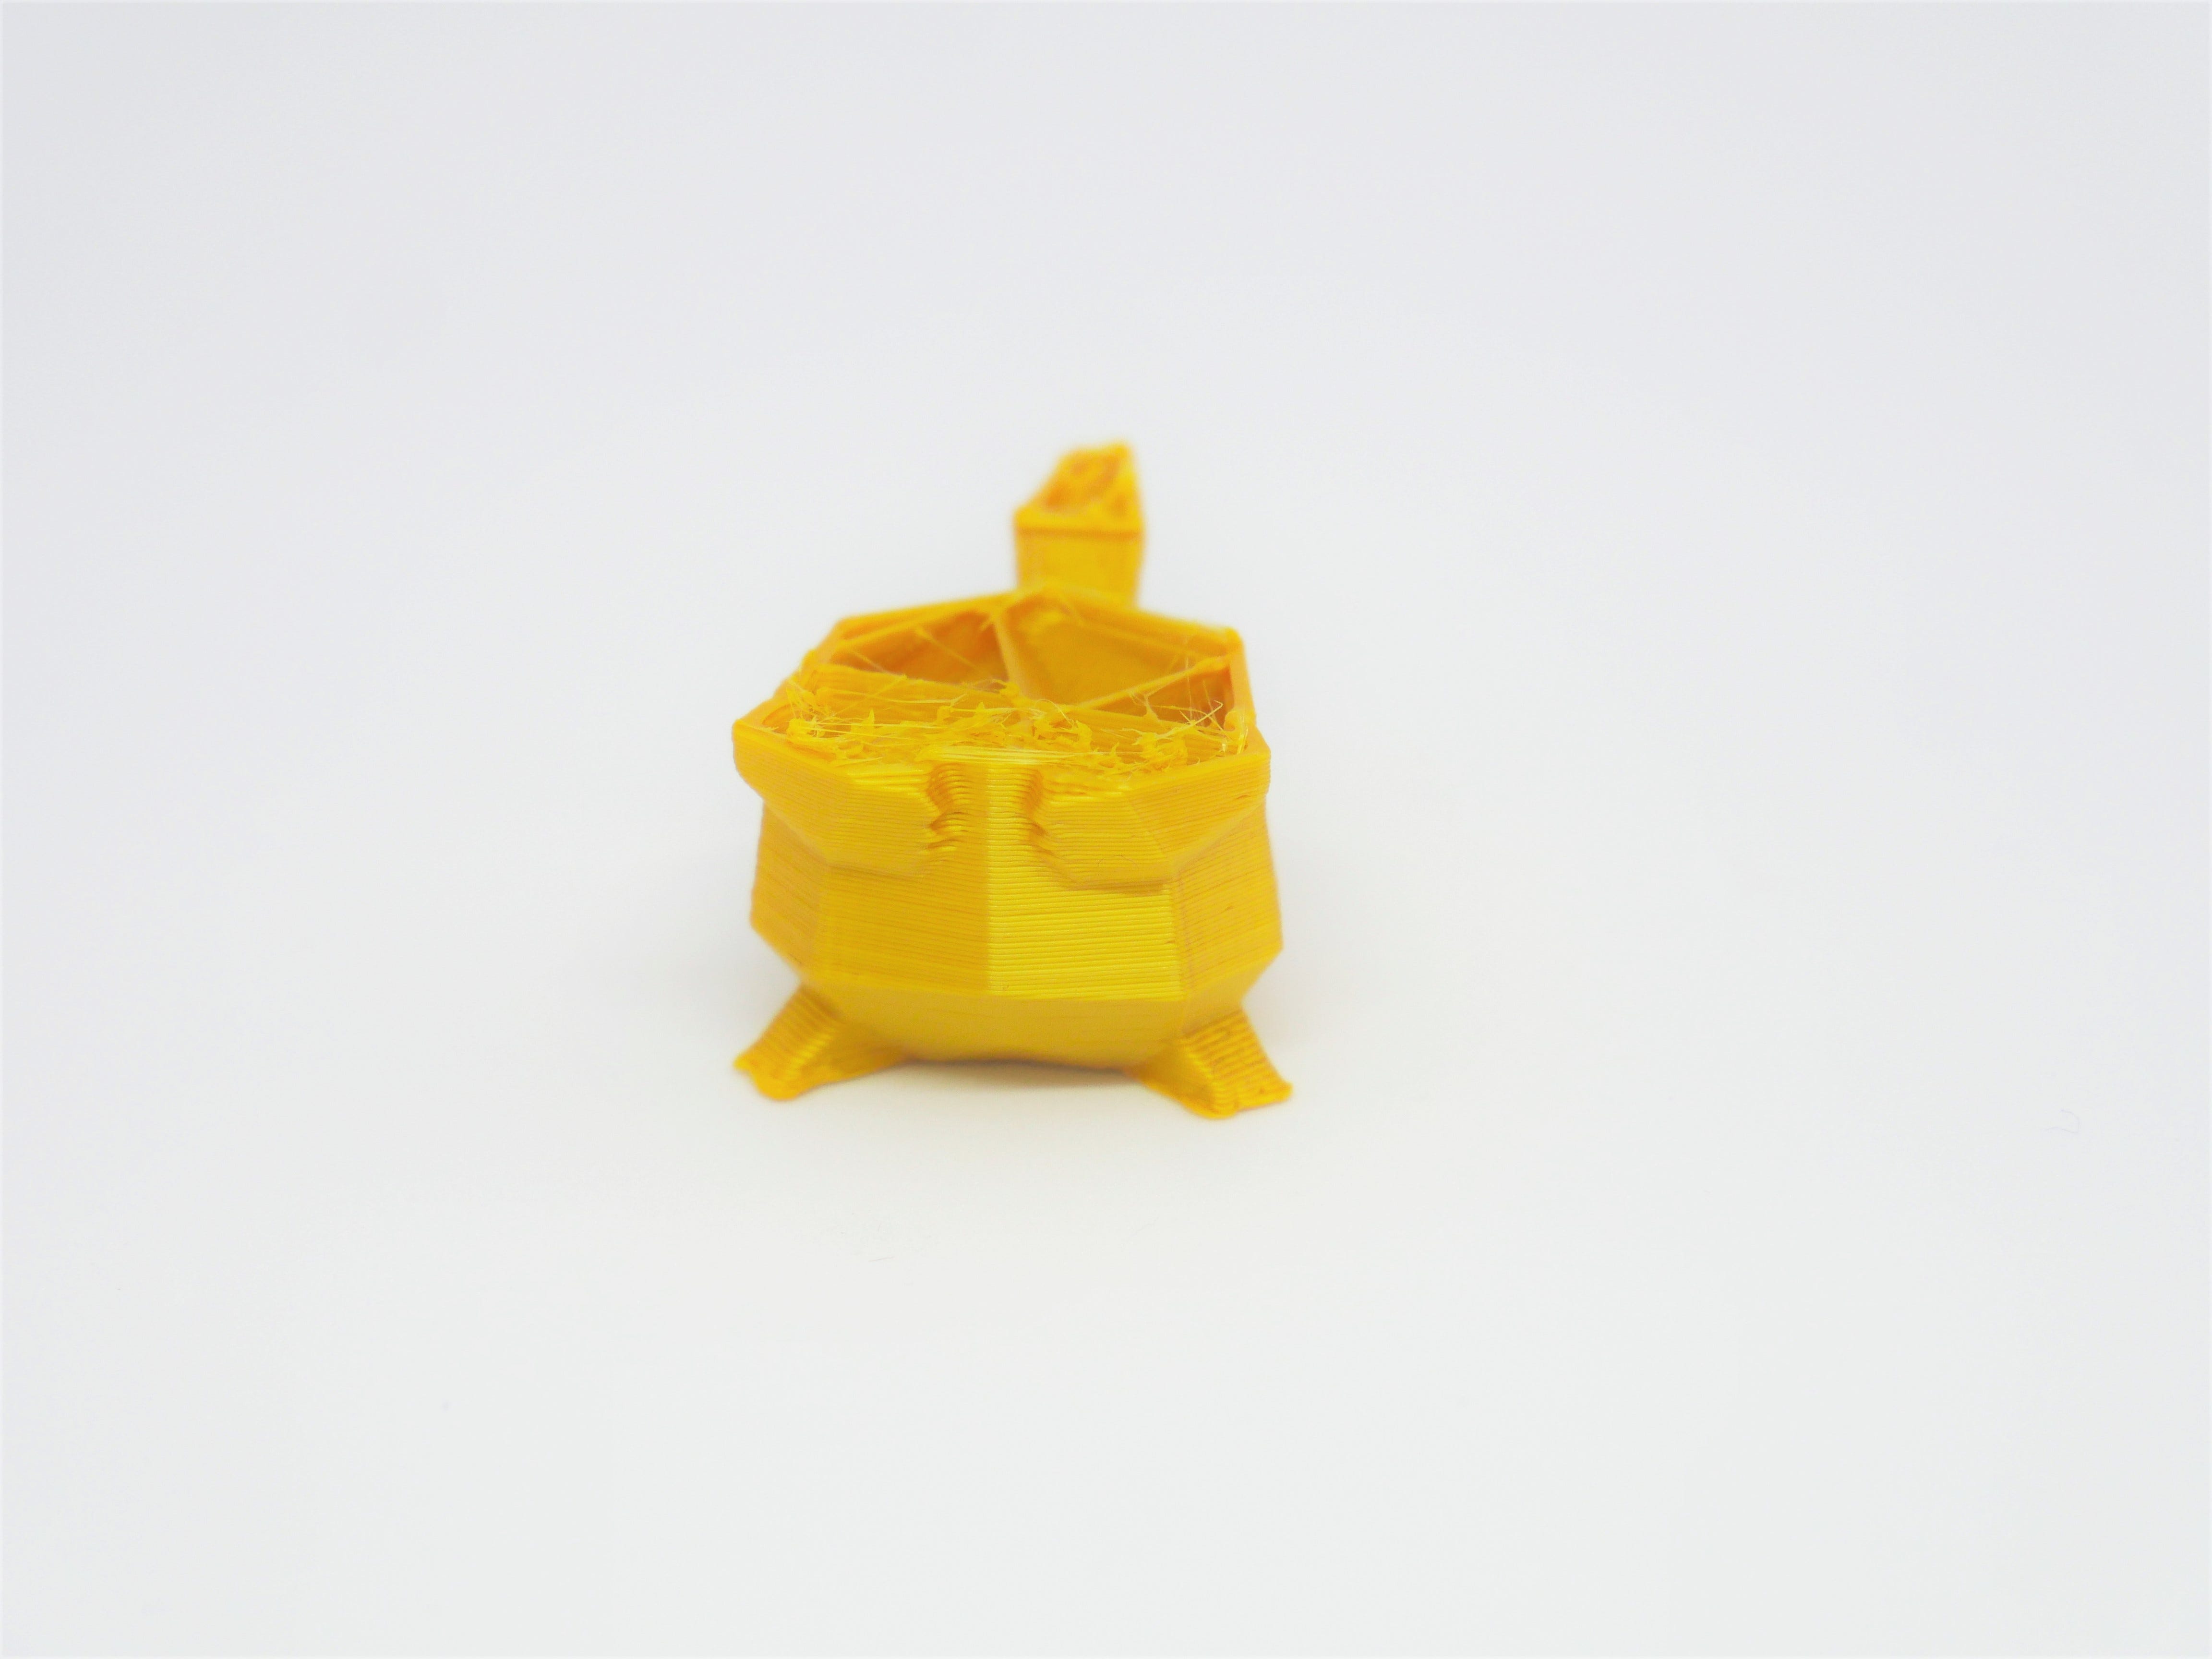
Stringing/oozing

It may be unavoidable with this model
Stringing may simply be unavoidable in the model you are printing. Models with small gaps between structures such as the one pictured above are most susceptible because the filament can’t retract fast enough.
The material you’re using is prone to stringing
If you’re using softer materials such as flexible filament (TPU), you are more likely to see some stringing in your prints.
Shifting layers
Axis belts are loose
The motors on your 3D printer each drive a belt that moves the axes. If any of these belts are loose, the movement of the motor can make the belt slip and shift the position of that axis. This can cause layers to shift and make your prints fail or look lopsided.
Motor pulley is loose
Similar to a loose belt, if the pulley attached to the motor is loose, the motor can’t drive the axis properly. This can sometimes be hard to identify, especially if you know the axis belts are tight enough.
Motor drivers are failing
If your 3D printer uses driver chips to control the amount of power that is delivered to each motor, you might like to check if these are working properly. If these chips are faulty or overheat they can cut out intermittently, causing random layer shifts. Consult the supporting documentation for your 3D printer before checking these chips.
Blocked Extruder
The following are possible causes of a blockage. For help on unblocking your particular model of extruder, consult the documentation of your printer.
Z offset is too low
If your 3D printer is producing incomplete layers or isn’t extruding at all, there may be a blockage within the extruder which is most commonly the result of your printers Z offset being too low. You may also see plastic built up around the exterior of the extruder nozzle or hear a clunking noise coming from the extruder motor.
Your extruder has a buildup of plastic around the outside
If you don’t fix a low Z offset soon enough, your 3D printer will be susceptible to what’s called retrograde extrusion. This is when plastic cannot be pushed out onto the print bed and travels back up the feed tube and can overflow into the insulation and get baked on.
Other extruder issues
Depending on the design of your printers extruder, there may be a few mechanical issues that can go wrong as well (possibly as small as a loose screw). Consult the supporting documentation for your printer before pulling the extruder apart to diagnose extruder issues.
Small parts weren’t printed
The design has features that are too small to print
Whether you designed the model yourself or downloaded it from the Internet, if a model has features that are smaller than the diameter of your printers extruder nozzle, they will not be printed. You can either redesign the model to include larger features or change the nozzle on your printer. Consult the supporting documentation for your printer before changing the nozzle.
Warping, curling and rough corners

The model you’re printing is prone to warping
Models that have a large base or any thin elements at the base are prone to warping. Large models that take up most of the print bed are more likely to warp because the accuracy of the bed levelling can vary over a larger area and the plastic has much longer to cool and come unstuck from the bed. Thin elements can curl up because the have less surface area to keep them stuck in the first place, especially sharp corners.
Brims and Rafts
You can also try including a brim or ‘feet’ (small discs that can be removed once the print has finished) on your print. These features will help hold the edges down by giving them more surface area. Both options can easily be removed once the print has finished.
Print bed isn’t level
If your print bed isn’t completely level, you may notice that your printer will print slightly higher on one part of the bed compared to the other, causing consistent warping.
Use a Heated Bed
If your 3D printer has a heated bed, using it can help keep the bottom layers of your part warm and help prevent warping. When these layers cool too quickly, the plastic shrinks and warps away from the print bed.
Control the temperature in the room and around the printer
If the air around your 3D printer is too cold, it will cool the plastic coming out of the extruder too fast which will prevent it from sticking to the print bed properly. Try and keep the room you’re printing in at a comfortable temperature (a good rule of thumb is if you feel comfortable in a t-shirt and jeans, then the temperature around the printer is probably ok). Be mindful of any drafts from open windows or doors as well.
If you’re unable to control the temperature of the room, an enclosure for your printer may help. Some printers already have an enclosed design for this reason, but external enclosures can be made or purchased. may already include an external enclosure specifically for this reason.
Inconsistent Extrusion

Filament is getting stuck or tangled
Check that your spool of plastic is feeding into your printer properly, making sure that it is able to rotate freely and that the plastic is easily being unwound from the spool. If the filament becomes tangled during a print, it will affect how evenly the filament is extruded through the nozzle.
Poor quality filament
If you’re using filament that is of poor quality, it may of an inconsistent width or contain extra additives that cause the plastic to melt inconsistently. Many plastics also tend to degrade over time, for example PLA will absorb moisture from the air over time causing the print quality to plunder. This is why many spools of plastic include a desiccant in the packaging to help remove any moisture from the spool. If you think your filament may be at fault, try swapping the spool for a new, unopened, high-quality spool to see if the problem goes away.
Extruder issues
There may be a blockage in the extruder preventing plastic from being extruded efficiently. You can check this by manually extruding some material and watching the nozzle to make sure there is an even and consistent flow. You may have to clean or unblock the extruder nozzle.
If all else fails you may want to check for mechanical issues with your extruder. Any mechanical issue largely comes down to the design of your extruder which can vary a lot between printer models. Check the supporting documentation for you printer on how to troubleshoot these issues.
Stops Extruding Mid Print
The filament may have snapped or come out during the print
In the case that the filament breaks during a print, you can follow up the broken piece with a fresh piece of filament mid-print if you catch it soon enough. To avoid this happening in the first place, we recommend proper filament storage to preserve its strength and the use of a spool to allow the roll of filament unravel itself easily.
Your printer has lost power or its USB connection has been interrupted
If the USB connection or power is disrupted during a print, your printer can no longer receive print information and will stop the print. At the very least, make sure both USB and power cables are securely plugged in at both ends and refrain from moving the hardware around during a print.
Your extruder has become blocked during the print
This is uncommon, but not impossible. If your extruder happens to get clogged up in the middle of a print, the printer will continue as normal without actually producing anything. It is a good idea to cancel a print straight away if you see this happen to avoid damage to your printer.
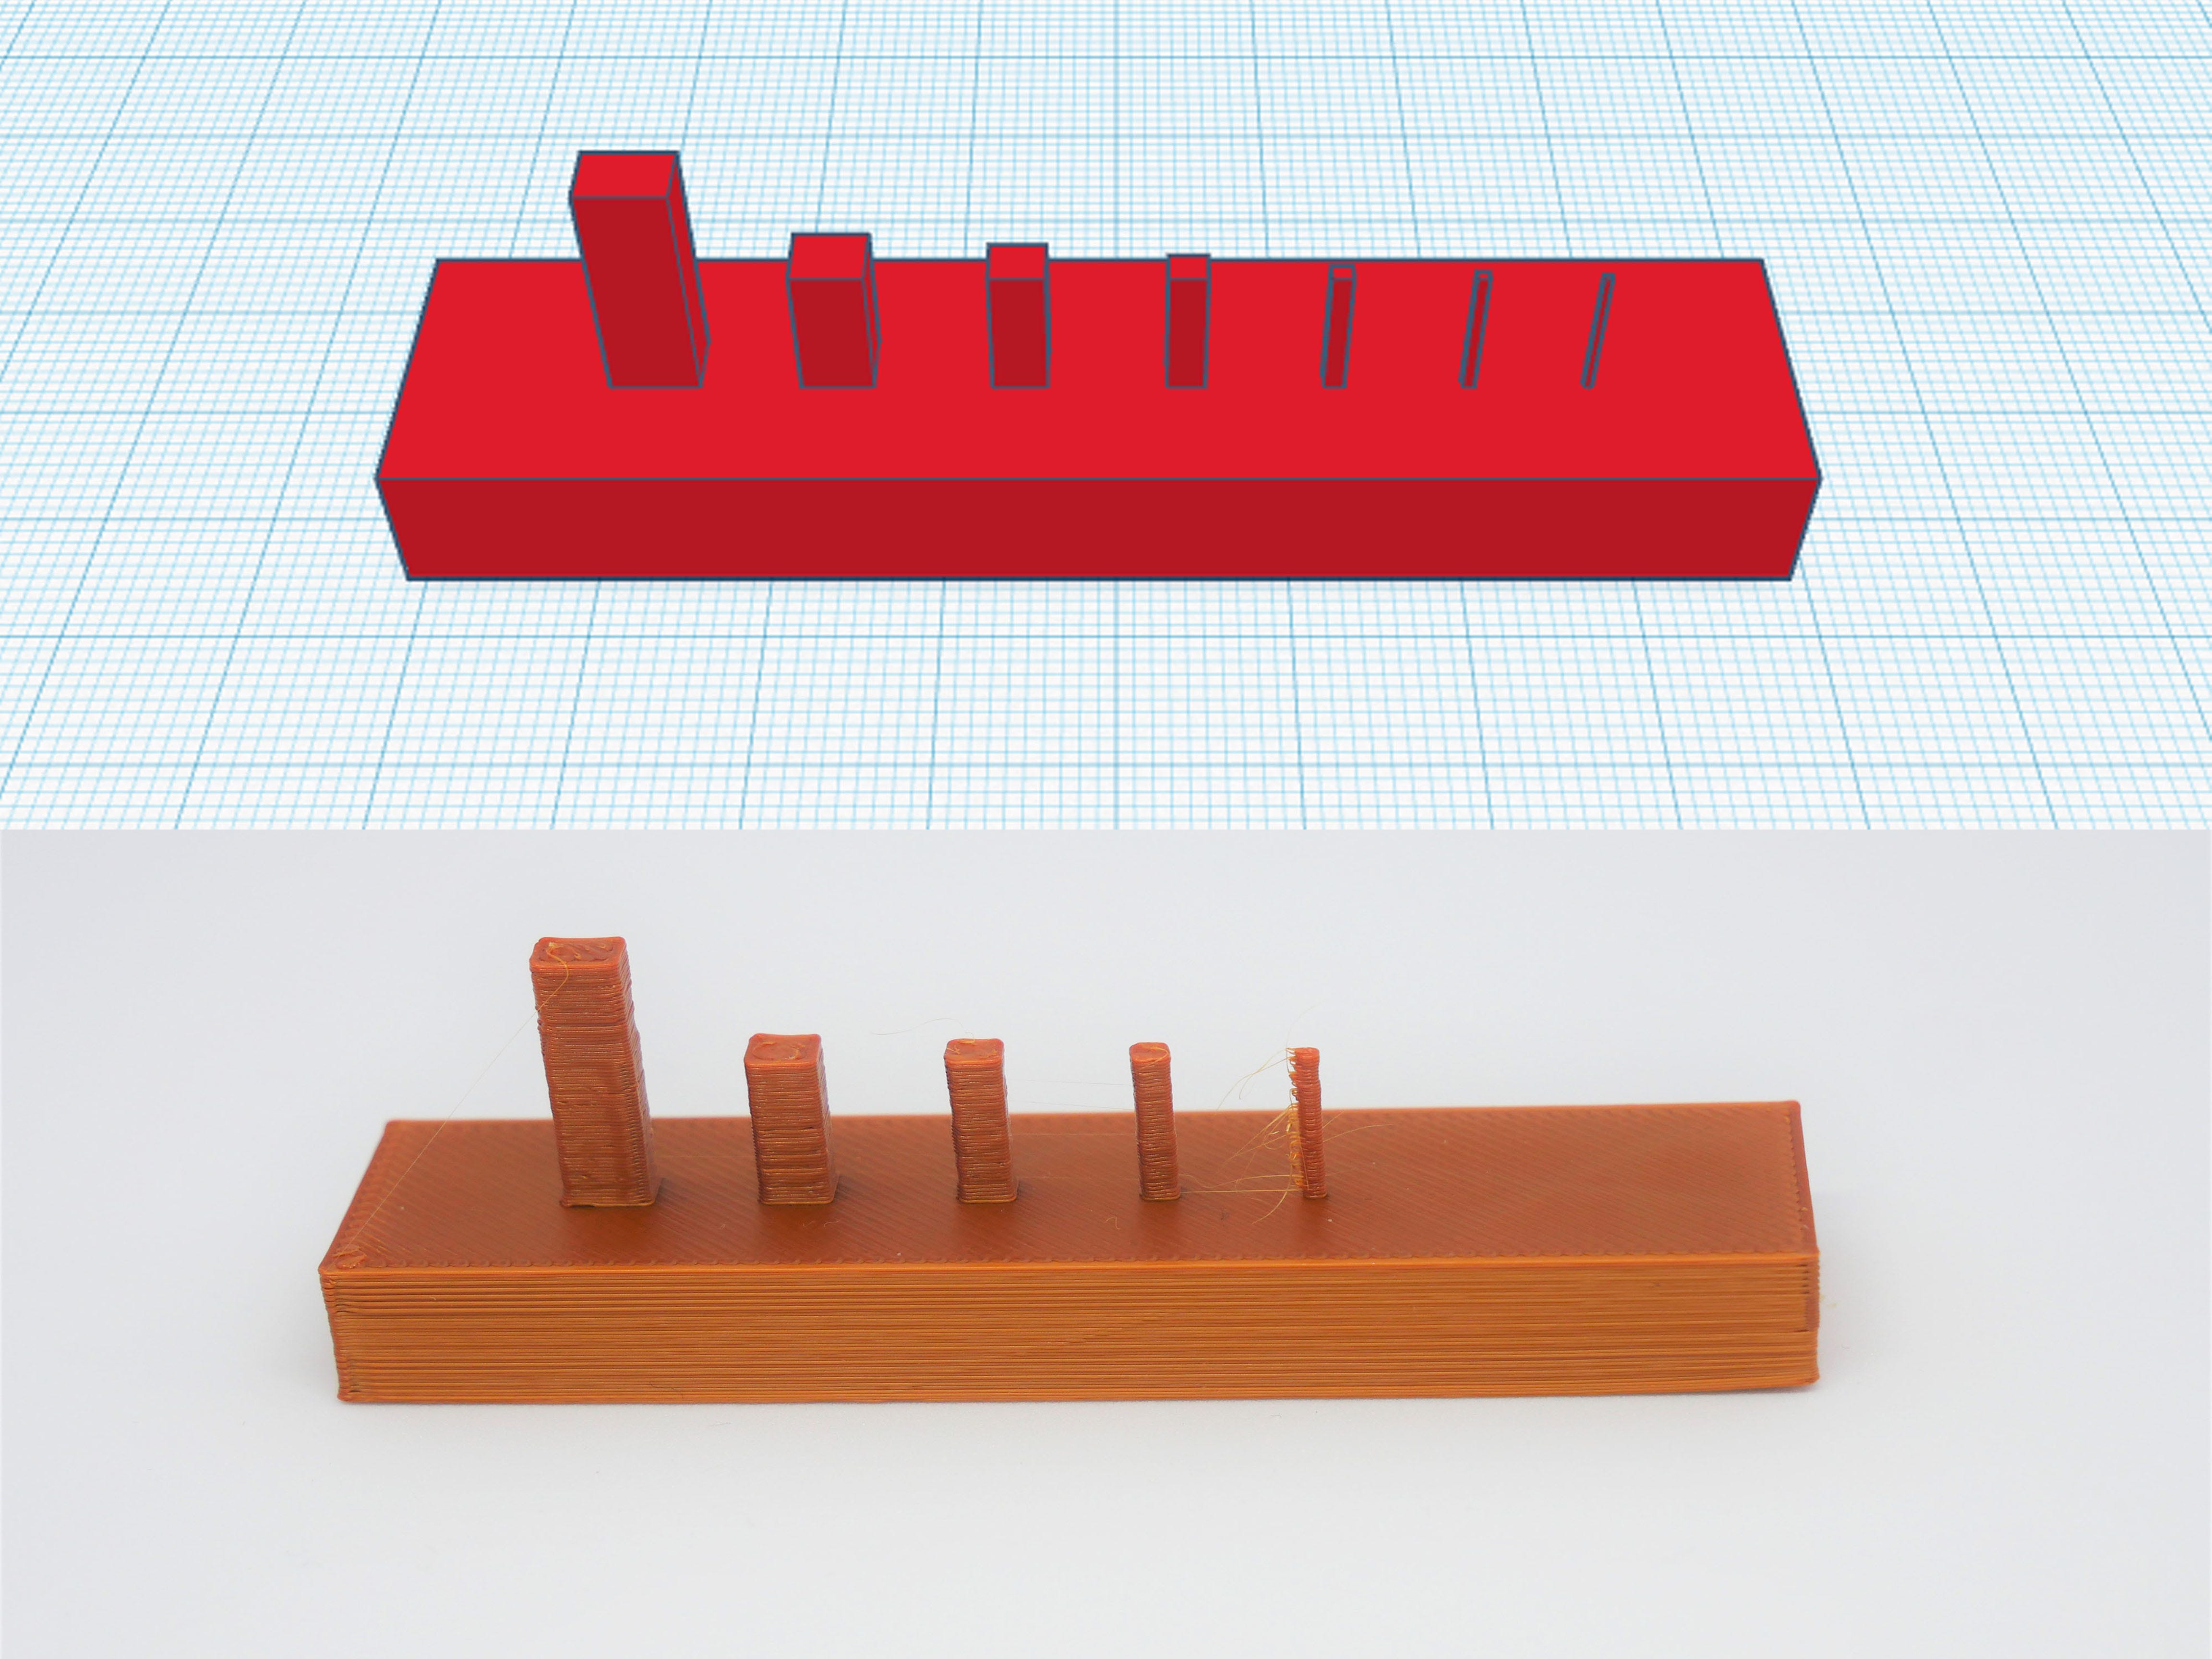
Overheating
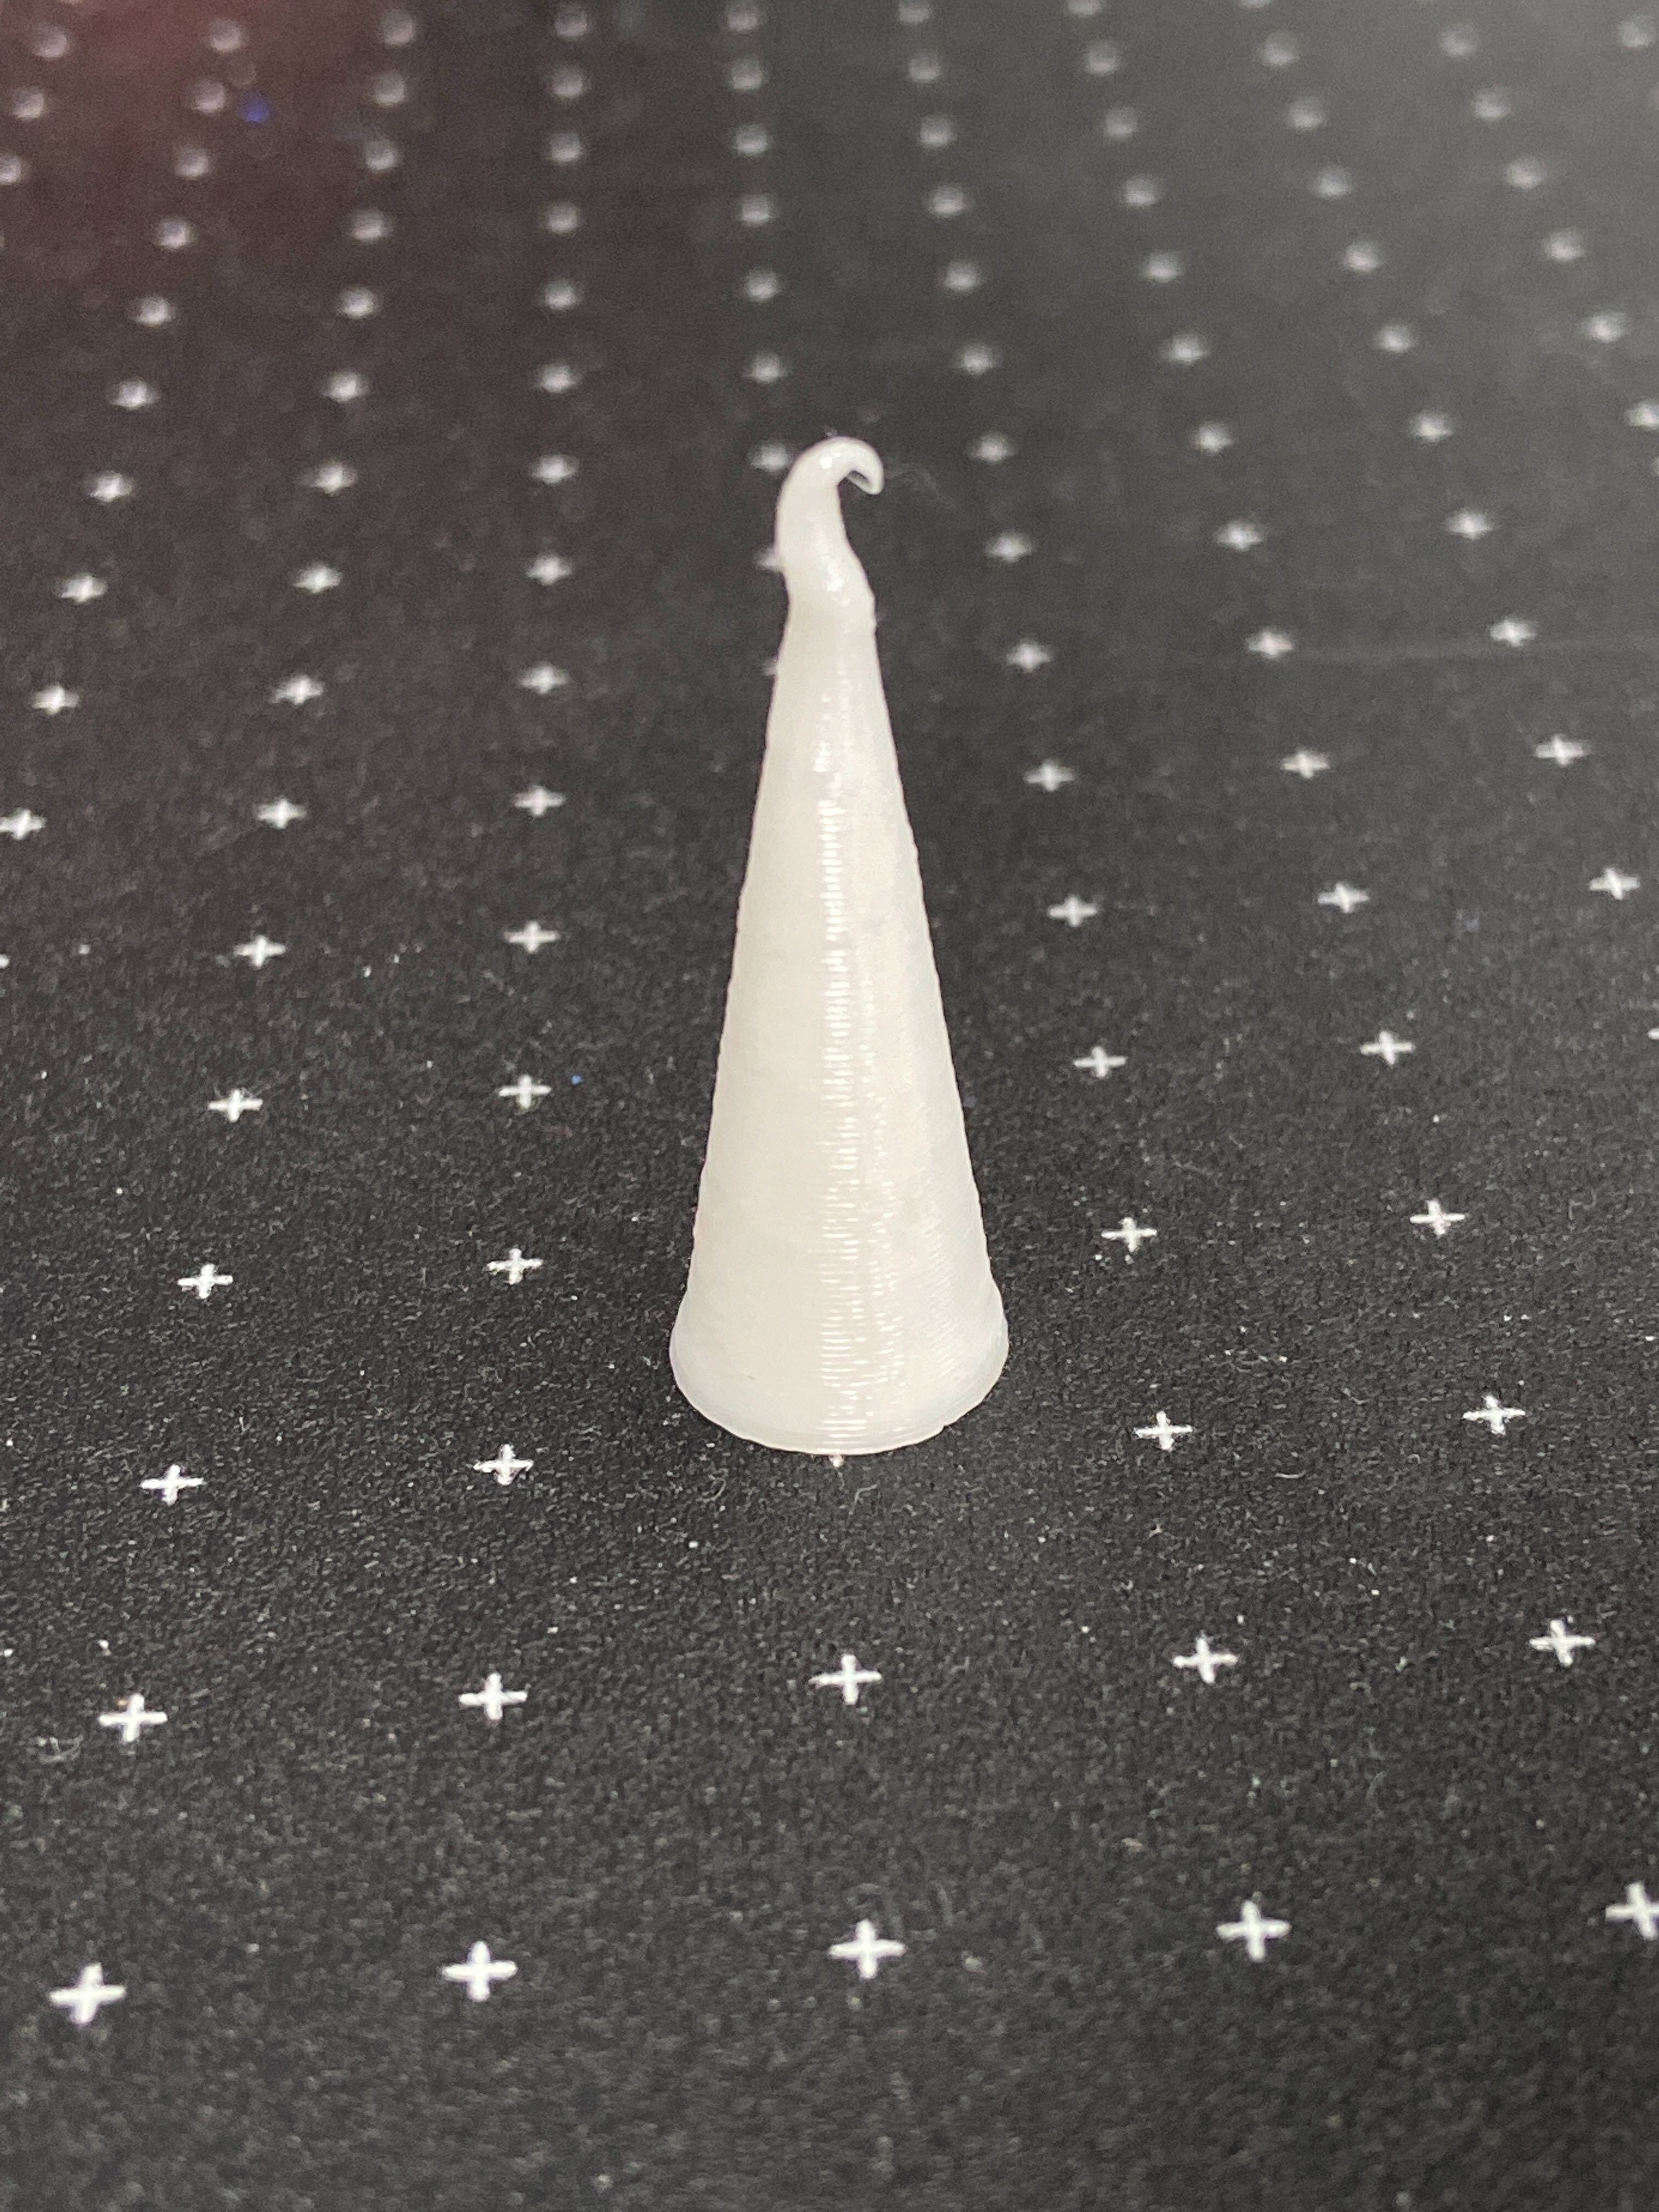
It may be unavoidable with the model you are printing
In the image above you can see how the filament extruded at the top of the Pikachu model looks like it was melted or deformed. This is because it was not able to cool quickly enough during the print to retain its intended shape.
This can happen on models that have narrow points because the extruder nozzles remains in the same spot for longer, melting the underlying plastic. Usually this isn’t an issue because the thing you’re trying to print may have other areas to print on the same layer, allowing the narrow point to cool. But, if this narrow point is the last thing left to print, there is nowhere else for the hot nozzle to go.
To get around this you can include a ‘waste tower’ in your design to give your printer two separate objects to print. This forces your printer to move to a different area of the print bed to build the waste tower, providing enough time for your model to cool down and prevent melting.
Layers separating and splitting

Filament got caught or jammed during the print
If your filament spool can’t unravel properly, your printers extruder will eventually have a tough time pulling filament through to extrude. This can result in a brief interruption in your print, causing a gap between layers.
This goes for mid-print blockages as well. In both cases, it is likely that this will cause the print to fail if left for too long. But, if you catch it early enough your print may not be affected at all.
Bad quality filament
If the filament you’re using is of poor quality, it may not heat evenly which can cause the flow of plastic to be interrupted during a print.
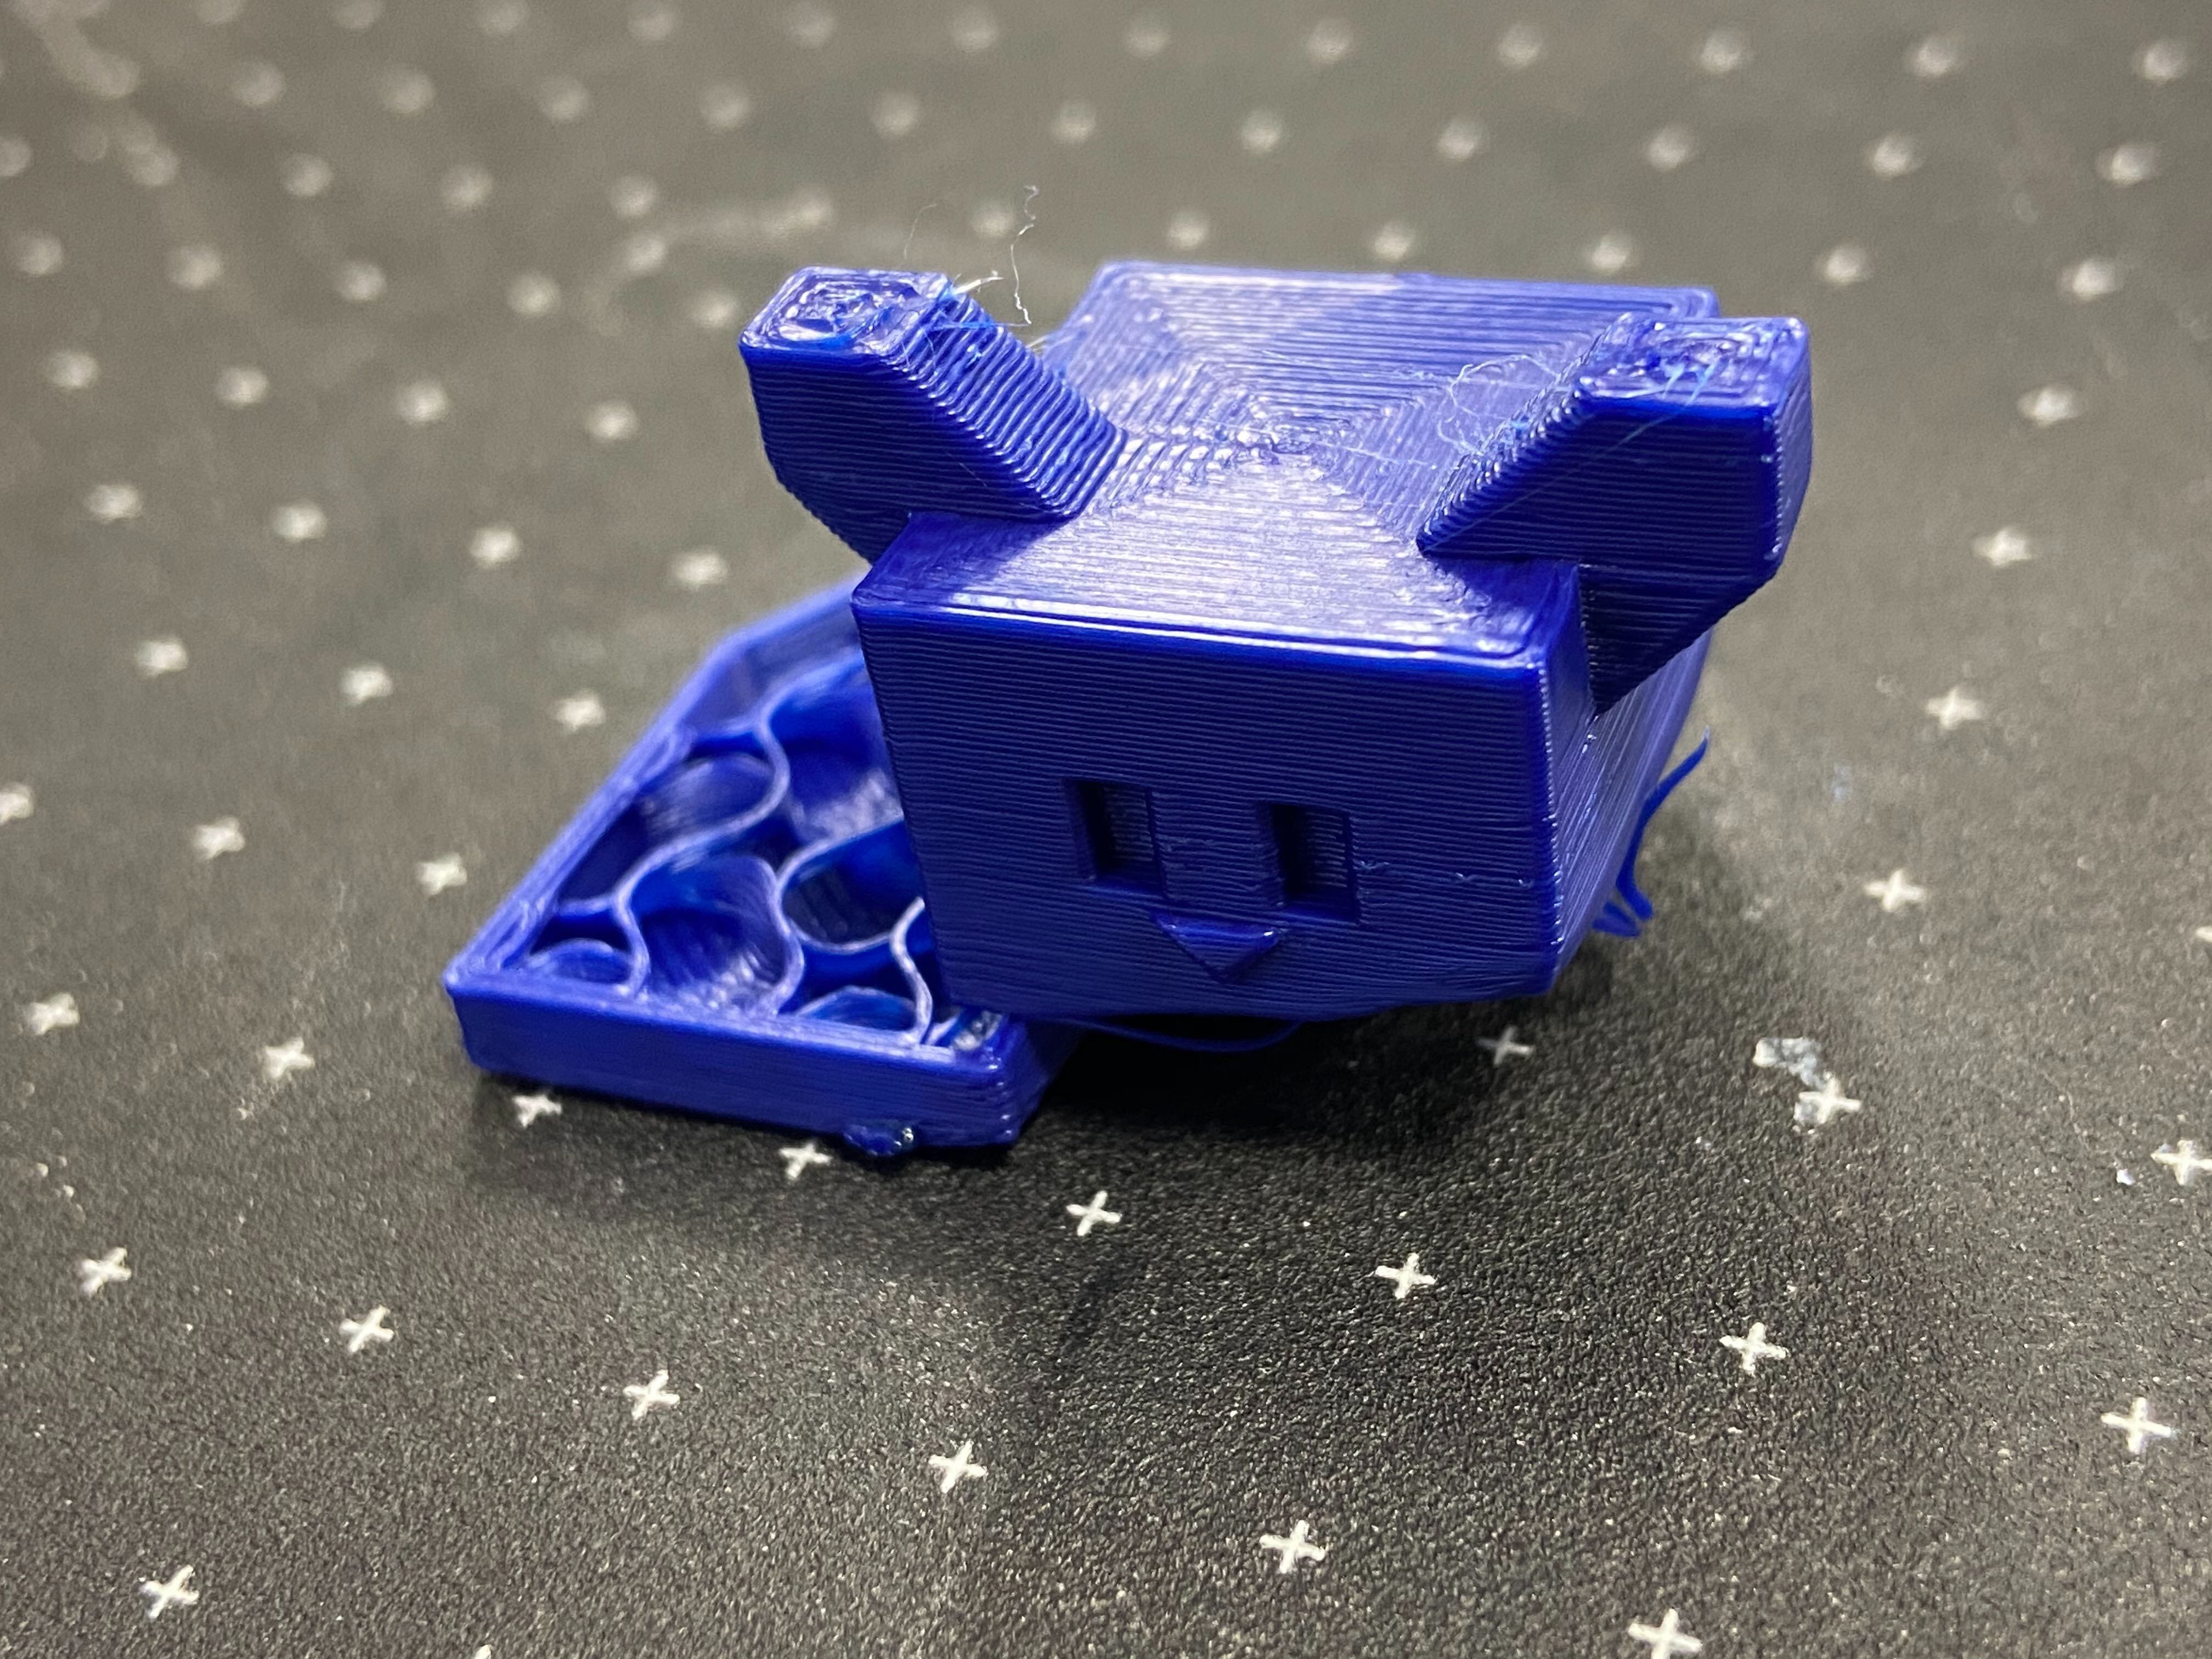
Blobs on the side of prints

Bad quality filament
If the filament you’re using is of poor quality, it may not heat evenly which can cause parts of your print to melt a little more than the rest. This can appear as extra blobs of plastic on the exterior of your models.
Lines on the side of prints
Vibrations during the print
The movements of your 3D printer may be causing it to vibrate while it prints. This can cause lines to appear in your prints and can also make a bit of noise. If you’re lucky, you can get away with sitting your 3D printer on a surface that won’t vibrate as much (DIY rubber feet are popular).
There may also be some mechanical issues that are causing the vibrations to occur. Check for loose screws, loose axes, loose belts and loose pulley fixtures. To diagnose what is actually happening with your printer, watch it closely while it is printing to identify the issue.
‘Elephant feet’

Your Z offset is too low
An elephant foot may occur if your 3D printers Z offset is set too low, meaning the first couple of layers will look like the plastic as been slightly squashed. Simply re-adjust the Z offset to optimal printing height and prevent plastic bulging out the side.
Loose axis/print bed isn’t level
If one of your printers axes is loose, the bed levelling procedure can be affected, whether it is manual or automatic. Make sure all axes are tight and aligned correctly to achieve a level print bed.
Related Articles
Extruder Makes a Clunking Sound
The clunking sound comes from the stepper motor in the extruder head skipping because it’s overloaded - in other words it’s taking too much effort to push fresh filament into the hot-end, melt it and extrude it onto the build surface. This can result ...Cleaning the print bed
If you're prints aren't sticking to the bed despite having good Z offset calibration, one possibility is that it the print bed surface is dirty. This can be a build up of oil from your skin or surroundings, as well as other debris such as dust. It ...Print bed not aligned properly
When to check for a misaligned print bed If your Me2 printers movement seems restricted or inaccurate in regards to the X and Y axis, then the print bed may have shifted. Some things that may be observed from a misaligned print bed include: - The ...How To: Print directly from a computer
We cannot support Cura. Any fault caused by the use of this software is not covered by our warranty. If using Cura, make sure your computer is not set to go to sleep after a certain time. If the computer sleeps, the print will fail. If you are unable ...Printer dropped and got stuck in a print
What caused this to happen? The cause of this issue can vary, but you should check the following things: Check if the blue USB cable was disconnected during the print. If the USB cable gets disconnected during a print, it interrupts the communication ...